Wednesday, October 11, 2017

Crosman 2300S aka Crosman 2300 Silhouette

CAUTION: Airguns are Not Toys and must be handled with Extreme Caution and Safety at All Times. Handle any Airgun as if it were loaded. Always keep it pointed down range or away from any people. Read all directions and cautions before handling. Adult Supervision is strongly advised. Make sure your back stop is adequate to stop any stray rounds or flyers. Never shoot at a hard surface as your bb or pellet may  ricochet and strike someone or something unintentionally.


Above: A few years ago I received this Crosman 2300S as a gift. My vision is not very good these days, in fact it is pretty bad. Iron sights are useless to me now. So I removed the sights and sold them. Then I started to customize the 2300 Silhouette. My plan was to play up the metallic finishes. When I got to this point (above) I looked at the pistol and said to myself "that is really fargin ugly". So I decided to put it away for a while. I figured eventually something would inspire me.


Then one day I saw these grips on ebay. My first impression was that they were a little "over the top". But I started to visualize the 2300S with a whole different look. Instead of adding more metallic finishes, like I did with the power adjuster and the muzzle brake. I would minimize the metallic finishes. I wanted to go black and blue with a lesser amount of metallic finishes showing. So I removed the muzzle brake and the power adjuster and started  over again. First I ordered the grips.


Above: While waiting for the grips (which were being made in the UK)  I installed a stock Crosman power adjuster. Not a big metallic monstrosity, but a small, dark and functional piece. It doesn't stick out, it just "blends in" and does it's job. At this point the grips were almost  finished. Latter I would find out they were made in a place called "Brick Kiln". Being of English descent and a retired Journeyman Mason, I took these things as good omens. The company that made these grips is Hirdhawks Design. Mr Hird kept me posted as to how the grips were progressing. Having never ordered anything from the UK before (except for a flash suppressor that didn't make through customs) I was just a little worried. So the updates were appreciated. I have a link to Hirdhawks Design in the right column under  "Some of my Favorites". Oh yeah. I almost forgot to mention Hirdhawks Design has a Facebook page as well.
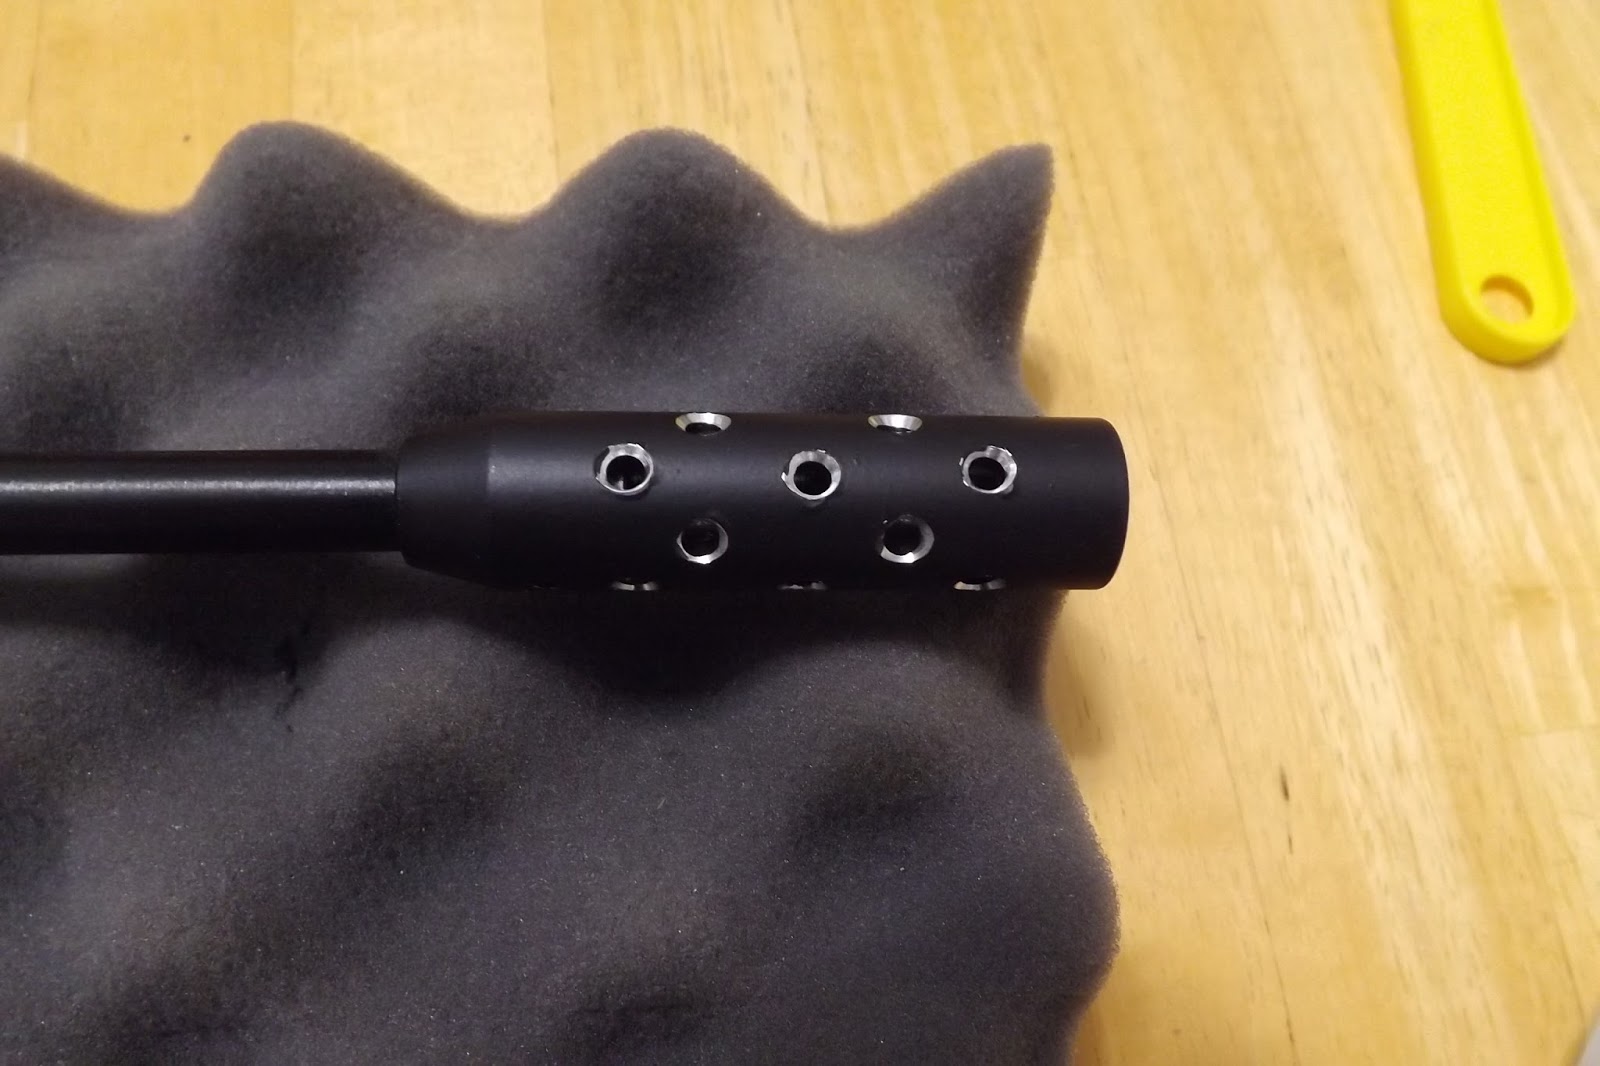

Above: I remembered seeing this Muzzle Brake on ebay. Just the right size. And the satin black finish contrasting the aluminum accents on the vents and crown face made this muzzle brake perfect for this pistol.  The muzzle brake comes from Alchemy Air Werks. (alchemywerks.com) I have a link to they're online store  on the "Some of my Favorites" list as well.  Now I need to apologize. There was nothing wrong with the first aluminum muzzle brake or the aluminum power adjuster for that matter. They just weren't right for this particular pistol. Both are high quality components. And both were snapped up quickly when I listed them on ebay. 

Above: One of the choices for grip screws was stainless steel. I thought "perfect this is coming together even better than I imagined". And that never happens! See how the grain shows through the black and blue finish, I think these grips look amazing. They are wider than the standard Crosman grips. I really like that because I have large palms. I am sure Mr Hird will work with you (as he did with me) to make sure you are totally satisfied with your new grips.
Above: I could not find this TRUGLO  4 X 32 mm scope in my very poorly kept records. I am  99% sure it came from Optics Planet. Along with the high profile rings. These rings have 6 machine screws each. I highly recommend purchasing good quality rings. An especially good choice for a pumper or a break barrel with  a spring action. Many a ground squirrel owes his life to poorly mounted optics :)

Above: This is the Crosman 2300 Silhouette finished. Not just another pretty face. This pistol with the Lothar Walther match grade rifled barrel is deadly accurate.

Above: With the extra long bolt handle there is now fumbling around when it is time to reload. As I mentioned before, this is a really sweet pistol right out of the box.

The trigger has two adjustments. It comes with the trigger sear spring adjuster which allows you to adjust trigger pull from 1 to 4 pounds. The 2300 Silhouette also comes with a over travel adjustment screw. This allows you to shorten the trigger pull after the firing point. It really gives the trigger a short and precise pull . Something this shooter has come to appreciate.

And once again the power adjuster comes standard on the 2300S . It really has Four functions (in my opinion). One it allows you to dial down the power when target shooting or plinking to get the most from your 12 gr powerlet (Co2 cartridge) Two, you can dial up the power for shooting small rodents and such. And three combined with a chrony it allows you to tune your pistol so you can get the max fps using the least amount of Co2. Four You can adjust your power to suit whatever pellet you are using. I am assuming here that different pellets perform differently at different speeds.

A nice view of the other side. Look at the length of that steel breech. Now that's a solid anchor point for a pistol barrel. And topped with a machined dovetail for mounting the optics of your choice. And I should mention, If you prefer iron sights. The standard rear sight is a Williams micro adjust tournament grade sight. Matched with a threaded post sight up front. Not too shabby!
This shot shows the exposed machined aluminum on the face of this awesome vented muzzle brake. Alchemy Air Werks. They really knocked it out of the park with this muzzle brake!
I couldn't be happier with the look, feel and performance of the pistol. Thanks to Crosman for making it. Thanks Alchemy Air Werks makers of really special custom parts and mods. Thanks to Hirdhawks Design. It was your grips that inspired me to finally finish this pistol. And thanks to Mr Hird for keeping me up to date on the progress of the grips. And thanks to Optics Planet for offering quality products at very reasonable prices. That pretty much covers the evolution of my Crosman 2300S.


For the last few years, whenever the Ground squirrel or Chipmunk population gets out of hand... the Hawks shows up and thin out the herd. Better the hawks eating them than me shooting them. (I guess😒)
Until next time. Have Fun! but Shoot Safe, I'm outta here, Hugh

Monday, October 9, 2017

Crosman 2289 Backpacker & Some Mods for the P1322

CAUTION: Airguns are Not Toys and must be handled with Extreme Caution and Safety at All Times. Handle any Airgun as if it were loaded. Always keep it pointed down range or away from any people. Read all directions and cautions before handling. Adult Supervision is strongly advised. Make sure your back stop is adequate to stop any stray rounds or flyers. Never shoot at a hard surface as your bb or pellet may  ricochet and strike someone or something unintentionally.


Above: Just the other night I decided to clean up my 2289 Backpacker carbine and put it up for sale. I had an idea that being a fairly nice, slightly modified backpacker that it might sell. They are no longer in production so I thought it might sell rather quickly. I had no idea just how quick that would be.


Above: When ever I get the chance, I like to clean my barrels when the air guns are taken apart.  It is always better to clean the barrel from the breech end of the barrel. This way I avoid doing any damage to the crown. I used a product called "Break Free CLP" to clean the barrel. I originally purchased it for my 9mm Beretta PX4, but wasn't satisfied with the results. So I thought I would give it a go on my .22 rifled backpacker barrel. Concerned that it might damage the "o ring" on the probe, I made sure not to leave any residue, CLP stands for Clean Lubricate and Protect. I am always suspicious of products that claim to do everything. And while I don't think it worked very well on my 9mm, it did a nice job on the air gun barrel.


Above: To clean up the steel breech I used a little bit of Crosman Silicone Chamber Oil on a Q tip. It did a bang up job, I will be using it more in the future.I cleaned the inner breech by incerting the Q tip from the back end. That's another advantage to cleaning the air gun when it is broken down.

Above: I like to use a wee bit of the BLUE LOCTITE on some of the machine screws. Just make sure you use the Blue loctite. If you use the red one, you might not be able to remove the machine screws. So remember Blue is Best.


Above: The re assembly went ok, except I mounted the breech and realized I hadn't installed the hammer...oooops. And that tiny breech screw can be a real pain in the arse. Almost without exception it falls off the Allen wrench just as I am trying to put it in place. And trying to hold the breech in place while replacing the tiny breech screw on to the end of the Allen wrench is always a joy!


Above: I eventually finished assembling the 2289 Backpacker carbine. Before posting it up for sale, I took a few shots out in the garage range , just to make sure everything was working properly. So why sell the Backpacker carbine?


Above: I have been doing a few mods on the new P1322.  And I think I would like to keep it for a while. And having two Crosman .22 carbines which are bisically the same air gun is not practical.


Above: The scope I removed from the 1377 custom carbine (to make the sale)  looks awesome on the P1322. This scope ended up on the 2289 Backpacker. I really like the P1322 as a long barrel scoped pistol. Maybe I'll make it sort of like the backpacker with a removable stock. Except in this case it will have pistol grips as well. A pistol scope with at least 12" of eye relief might be a good choce. At times the P1322 will be in the long barrel pistol mode and a minimum of 12" of eye relief will be necessary. I will look for a scope with an eye relief of 12 to 18  inches. Eye relief is basically the distance between your eye and the scope at which the scope is still effective. With the P1322 in pistol mode I will want to be able to extend my arms and still be able to use the scope. A friend of mine who was a sniper during the Vietnam conflict advised me that "18 inches of eye relief should work for me"


Above: I wanted to try a different stock this time. A custom wood stock was one idea. But I do not want to spend quite that much money. So I thought I would try this collapsible A-R style stock with the power adjuster / adapter. I took the barrel adaptor and air stripper off the 2240 custom. (I have a different muzzle brake ordered for the 2240) I wanted the new 14" rifled barrel to look a bit longer. I think the adapter and Air Stripper accomplished that nicely. And in pistol mode I can remove the Air Stripper to "shorten it up" a bit.

Above: I'm not sure if I am going to replace the pump lever grip. It seems there is a real shortage of Backpacker style pump lever grips. I suspect they have stopped producing them. I hope I am wrong about that.The Backpacker pump lever grip is an awesome upgrade. It looked really good with the crosman skeleton stock and was a really comfortable fit for larger hands. This new design pump lever grip is really sharp and I like how they design matches the new style grips. But I just want something that looks beefed up & fills the hand a little better. I am considering purchasing an unfinished wood pump lever grip and smoothing out the edges and painting it satin black.

Above: About the 2289 Backpacker Carbine. I listed it for sale at 2:00 am Sunday. When I got up at 9:30 am it had already sold. I really enjoyed owning and shooting the 2289. But I have a few other airgun projects going, so it was time. I also recently finished my Custom 2300 Silhouette so I'll be blogging about that soon. And I have something in the works with the Crosman Custom Shop. Until next time, Have Fun but Shoot Safe. I'm outta here, Hugh

Friday, September 22, 2017

Cleaning & Talking about The New Crosman P1322 American Classic

CAUTION: Airguns are Not Toys and must be handled with Extreme Caution and Safety at All Times. Handle any Airgun as if it were loaded. Always keep it pointed down range or away from any people. Read all directions and cautions before handling. Adult Supervision is strongly advised. Make sure your back stop is adequate to stop any stray rounds or flyers. Never shoot at a hard surface as your bb or pellet may  ricochet and strike someone or something unintentionally.
Above: My brand spanking new Crosman P1322 American Classic. You might assume that your new pistol is nice and clean and ready to shoot. Well it might be ready to shoot (I said might) but it might not be as clean as you think.
Above; These dirty patches are from cleaning my new P1322. Now don't get me wrong this is normal for most new airguns. At least those in the under 100.00 price range. But what better way to get familiar with your new air gun than to clean it?
Above: After cleaning it I took the P1322 out to the garage range to fire it a few times. I fired fine, but I did notice there was a little more resistance than I expected when I was pumping it up. A few drops of pellgun oil on the side of cup (see pic above) took care of that. I will have to go back and check the specs. Because this P1322 feels more powerful than my 2289 Backpacker. Now for the new stuff on the P1377
The newest style grips. I like these grips a lot as far as "the look" goes. They are very stylish for sure, and match the new design of the fore grip / pump lever. But the feel is not as good as the grips on the modern 2240's. But both feel more solid than the old grips that had the Crosman Logo embossed on the grip. Those definitely needed to go. Overall I like these grips. And who knows, I might even get used to the new feel.

Above: As for the new Fore grip / lever design, I like it. It is a huge improvement over the skinny wood grain brown plastic one on my old 1377. And the new style matches the new style grips nicely. And this pump lever is more comfortable to use than the skinny ass woodgrain plastic one was for sure.


Above: The aforementioned 1377 American classic plastic/wood pump lever next to the new design P1322 American Classic pump lever.
But is it as comfortable as the fore grip / lever was on the 2289 backpacker? Well... I have big palms, so for me definitely not as comfortable as the backpacker grip. But I do think it is a huge improvement over the old plastic wood ones for sure. And for smaller hands, maybe just as good? I don't really know.
Above: Those are screws baby! Not pins, but actual screws! I had to double check before saying this. Both my 2289 Backpacker and my 1377 modified carbine with the backpacker style pump lever have pins. Not sayen pins are bad, but change is good too! I should also mention the Phillips Head screws on the Grips match the fore grip / pump lever perfectly.
Above: Ok I checked the 2289 Backpacker had a claimed Max Velocity of 480 fps. And the new P1322 American Classic has a claimed MAX Velocity of 460 fps. Being the 2289 has the longer barrel I'm gonna say they are about equally powered. The specs on the 2289 Backpacker come from Pyramyd Air.
Above: My 1377 American Classic Carbine. I would like my P1322 A.C. to be a .22 caliber version of my .177 carbine. If I go with the same breech and same length barrel it could make for some good comparison tests. Like fps vs Brute Force, which is really more effective? I would like to do a custom wood stock on this one but OMG they are expensive. But then again, the new grips on my 2240 Co2 Pistol (with the finish work) cost as much as the 2240 pistol originally cost me. And I have no regrets about that. Maybe I'll do a tactical stock that would be a little more cost effective. And that would be a first for me.
Until Next Time, Have Fun But SHOOT SAFE, I'm Out, Hugh

Friday, September 15, 2017

Crosman Arms Co. Inc. V-350 Slide Action bb Air Rifle. Produced from 1962 1969

CAUTION: Airguns are Not Toys and must be handled with Extreme Caution and Safety at All Times. Handle any Airgun as if it were loaded. Always keep it pointed down range or away from any people. Read all directions and cautions before handling. Adult Supervision is strongly advised. Make sure your back stop is adequate to stop any stray rounds or flyers. Never shoot at a hard surface as your bb or pellet may  ricochet and strike someone or something unintentionally.
ABOVE: MY Crosman V 350 SLIDE ACTION B.B. RIFLE. If what I have read so far is correct, the V 350's were produced from 1961 through 1969. But the technology goes back well into the 1800's.
I have also read that the V 350 indicates that this air rifle was capable of launching a bb down range at 350 fps. And the SLIDE ACTION describes the cocking mechanism.
Above: The Loading Directions. This was taken from a PDF file that Crosman has made available.
Above: This was taken from a PDF file that Crosman has made available online. The Shooting directions. I wonder how many people failed to read the instructions and shot themselves in the palm of the hand. I think the indicator holes for checking if the bb is chambered and another to indicate if the rifle is cocked are both great design features. When I was given this bb rifle from a friend who inherited it, I really had no idea about these features. He knew how to load it and cock it and fire it and that was about it.
Above: Top line reads CROSMAN ARMS CO INC bottom line reads FAIRPORT, NY. MADE IN USA. The engraving on the barrel is deep and also serves as a hand grip surface for cocking the bb rifle.
Above:This was taken from a PDF file that Crosman has made available online.  How to lubricate the V 350 . Which I did immediately after reading this.
Above:This was taken from a PDF file that Crosman has made available online. This diagram shows the lubrication points as well as identifying other parts such as the loading port.
Above: Here you can see the holes that are shown on the diagram above. The extra hole (third back from the front) is the mounting hole for the missing rear sight. I check ebay from time to time for the rear sight, but haven't found one yet.
Above: A view of the V 350 from the other side.
Above: A view of the trigger guard and trigger. I really like that vintage trigger and it is surprisingly comfortable to use.
As for the stock I have not refinished it. I have touched it up with a "Furniture Repair Marker" . These markers come in a set with about 6 different shades. They are great for touching up all your wood work around the house as well.
Above:This was taken from a PDF file that Crosman has made available online.
These safety instructions are pretty basic, but all good advice. I think if you could you go back in time in America, especially in rural America. I think you would find that people were more familiar with firearms, as they were more apart of everyday life. Being a city kid, I first learned to shoot at our Local "Boy's Clubs of America". We might have been shooting air rifles just like this one, but I honestly don't remember. That was after all 50 years ago, but it is definitely possible.
Above: The old V-350 does show some wear. My friend did tell me it was on a farm that he visited regularly as a boy. I am sure it was put to good use.
Above: I do shoot this air rifle from time to time, just enough to keep it from freezing up. At some point I would like to Shoot it through a Chrony just to see how close to 350 fps it can still shoot.
BELOW: I hope you are able to blow up or zoom in on the next diagram. (Also from a pdf file Crosman has made available online) The prices are unbelievable !

Until Next Time. Have Fun but Shoot Safe! I'm out Hugh

Monday, September 4, 2017

CNC Walnut grips and a Stripper!

Airguns are Not Toys and must be handled with Extreme Caution and Safety at All Times. Handle any Airgun as if it were loaded. Always keep it pointed down range or away from any people. Read all directions and cautions before handling. Adult Supervision is strongly advised. Make sure your back stop is adequate to stop any stray rounds or flyers. Never shoot at a hard surface as your bb or pellet may  ricochet and strike someone or something unintentionally.
Above: Here I had this muzzle brake / adaptor with 1/2 x 20 tpi (threads per inch) UNF. All well and good, but 1/2 x 20 tpi UNF is not all that common in the USA. So I ordered this really cool Flash Supressor (what every air gun needs lol) from the UK. Unfortunately it never cleared customs. And now I'm probably on someone's list of international arms dealers! Sister Marie Therese would be so proud :)
So one night while scouring the internet for something cool to attach to my 1/2 x 20 adaptor. I spot this Hatsan Air Stripper .22cal 1/2 x 20. Be still my heart! Could this be real? Hey, what do I have to lose? I ordered it. It finally arrived, and then the moment of truth. Will the threads match. Halleluyah! It fits! It doesn't really take much to excite me these days.
Above: Here's that part number. How does an Air Stripper work you ask? Have you ever seen the explosion of Co2 gas that comes out of the barrel, especially when you have a fresh powerlet and the power adjuster is dialed up. That explosion causes turbulence. And just like on an airplane, turbulence can make for a bumpy ride. Anyway, as the pellet or other projectile exits the barrel it immediately enters the cone shaped tube. This separates the pellet from the turbulence. And because the cone gets wider, it diverts the turbulence out the vents and away from the projectile. This allows the pellet to fly flat or correctly. This minimizes wobble and prevents the pellet from tumbling. Is it necessary? Maybe not, However, with the Air Stripper attached and using the new pistol rest, I was able to do something I have never done before while shooting any air pistol in my garage range. Let me find the pictures brb.
Above: After getting dialed in and hammering the kill zone of this silhouette, I took one shot at each of the over the shoulder targets. The bull's eye on these is about the size of a dime.
Above: I hit both sides on the bull's eye with one shot. Then I called it a night. The distance is 8 yards or 24 feet.
Above: this is my garage range shooting table or station. This night I was shooting seated using the pistol rest.
<~This is the view of the target from behind the shooting table. While the distance isn't great, these silhouette targets are roughly about 1/5  the size of the silhouette targets at the indoor range. So I guess this would be like shooting a full size silhouette target at a much farther distance. That is one of the reasons I like these SplatterBurst targets. Having silhouette targets available that are designed for the smaller home range is awesome. And being able to see where you are hitting the target is priceless. Sometimes I like getting out the 9mm  or the .22  cal target pistol and heading off to the indoor range. But it seems like I always end up next to the guy shooting a cannon. It is not only cheaper to shoot airguns at home, it's a whole lot quieter too.
On the left the Walnut CNC machined grip. I like how these grips go over the safety. And how the grip follows the curvature around the back of the trigger guard.
Here is a better shot of that grip. You can find these on ebay. Today I spotted (on ebay) some custom grips made in England and they were "off the charts cool". Hey that's all I've got for now. I am working on a Crosman 2300S that I am real excited about. I ordered the muzzle brake for it today. And hopefully I'm going to be ordering the grips tomorrow. Until Next Time, Have Fun! But Shoot Safe. I'm out. Hugh